These instructions will guide you through stripping down an A4 laptop to remove the motherboard. They also cover replacing other internal components apart from anything in the lid (instructions for that here) - you only need proceed as far as is necessary to remove the part you're interested in. Due to the way the A4 is constructed there is usually only one order in which you can proceed so there isn't much scope of taking shortcuts if you want to remove only one item, or forget to replace something. Please read them through before you start.
You will need a crosshead screwdriver (2-3mm diameter), a similar flathead screwdriver, a larger crosshead (about 5mm), and devices for levering (eg thin flathead screwdrivers or a craft knife with a strong blade, preferably blunt). The watchword for this procedure is be gentle - everything is made of plastic, so will snap if you apply too much force.
- Shut your A4 down, remove all cables and the battery.
- Flip out the Econet interface/blanking plate to the rear of the keyboard and unplug the Econet interface if you have one. You should see two flat white screen cables coming from the screen and plugging into the motherboard.
- Using a screwdriver, gently push up the left and right sides of the top of the connector, which after both sides are unclipped should slide up about 1mm with a gap between it and the bottom part of the connector. Then the screen cables should come away very easily - if they don't, don't force them, but work on unclipping the connector as above.
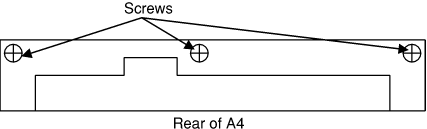
- Remove the three rear screws:
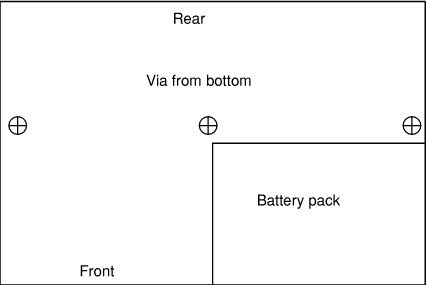
- Remove the three base screws:
- Take away the lid assembly, and put it to one side. Now work on the base of the unit.
- Unclip the keyboard cables in a similar way to the screen cables. Again be gentle - this time you can't replace the cables if they are damaged because they cables are part of the keyboard membrane. The keyboard should lift out - you can push it from the battery compartment to release it.
- Remove the metal screening plate over the floppy drive.
- You can now access the inner components of the A4: the DC/DC converter, the floppy drive and the hard drive.
- To remove the floppy drive, turn the A4 over and unscrew the four screws holding it into the base. If you want to remove it completely you also need to unclip the cable - again like the screen cables - but often it's unneccessary to disconnect the drive completely since there's plenty of slack in the cable.
- Now remove the small vertical DC/DC converter board in the middle of the main PCB and the screening plate behind it. When you come to reassembling the machine be especially careful that this board is plugged into its socket correctly, since being misaligned by one pin in any direction may damage the machine.
- You can now remove the hard drive. Carefully unplug the cable from the motherboard, trying not to pull too hard on the cable (this might cause damage but since there's nothing else to grasp the cable with pulling the cable is inevitable). The hard drive cradle has one screw attaching it to the rear of the machine, and (possibly) one screw underneath the floppy drive (mine only rests on a pillar here - there is no screw - but it's impossible to remove it without taking out the floppy drive first). If you want to replace the hard drive, unscrew it from its cradle and fit the new drive in place.
- Now we have the motherboard left to remove. From the outside of the case, unscrew all the screw posts for the monitor, parallel and serial ports (these are the hexagonal pillars into which cables are screwed to keep them secure) - a small pair of pliers is useful for this. The pillars screw into nuts behind the sockets - make sure you don't lose the nuts.
- Unplug all the cables plugged into the motherboard (make sure you remember which cable goes in which socket, and its orientation).
- Now turn over the A4 and unscrew the three screws in the base at the rear of the machine. You may have trouble with these since they only screw into threaded pieces of metal which have been stuck to the motherboard - if they become unstuck they're harder to unscrew. Also unscrew the single screw at the bottom rear of the machine, on the left when looking from the front.
- You should now be able to remove the motherboard. Take care not to damage it since there are components on both sides. Because of the sockets on two sides, there's only a limited angle in which the board will come out - don't be tempted to try to bend the plastic to help it.
To reassemble the machine, reverse these steps. As you do this, there are some useful things to remember. Remember to check the DC/DC converter is on its pins correctly. Make sure the hard drive cable isn't off by one in any direction. Check all the flexible cables are properly seated and not skewed. Ensure there aren't any loose screws in the machine.
A useful tip when fitting self-tapping screws (of which the A4 is full) is to turn them anticlockwise in the hole until you feel a click. This engages the start of the thread, and you can now start screwing them in clockwise without cutting a new thread in the plastic - this is easier and doesn't weaken the plastic. I wouldn't recommend using a ratchet or power screwdriver here, since it's harder to feel when screwing is difficult because you're cutting a new thread.
Page by Theo Markettos (email at theo [at@] markettos.org.uk), last modified 2005-08-17
Return to A4 page.