The tech behind Middle-Earth Weather
This is part two of a two-part article. In the first part I explained my research for this project, leading to the creation of my map slides. This part builds on that to show how I turned it into the film…
Chroma key
Chroma key, sometimes known as green-screen or blue-screen, has been the compositing technique behind most TV weather bulletins since the 1980s, and is the mainstay of mine.
It’s a delightfully simple idea: you put your talent in front of a single-coloured background. In post-production - or live, if you have sufficent processing power - the compositor takes source A, automatically turns the background colour transparent and overlays it on top of source B.
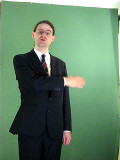
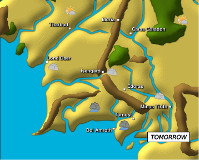
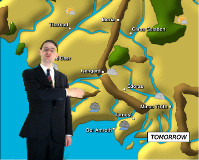
In the case of a weather forecast, you prepare some slides and chromakey makes your presenter appear in front of them, like this:
 |
+ |  |
= |  |
Chroma key also crops up to provide special effects in a huge number of TV and film projects. For example, if your talent wears a garment of the same colour as the background, they vanish into it: this is how you might achieve a “cloak of invisibility” effect. Readers of a certain age - like me - may remember Friday afternoons glued to Knightmare (ITV 1987-1994) which made heavy use of chroma key to make the dungeoneer appear, well, wherever the script writers wanted them to!
The whole point of chroma key is that it works its magic automatically. Prior to its invention, achieving that sort of effect involved manually tracing over the live action on a frame-by-frame basis - workable if you’re a big Hollywood studio with a vast budget, but not exactly within a hobbyist’s grasp!
Early chroma key required expensive dedicated kit, but these days it’s all done in software. The major caveat is that you have to get the lighting right, or at least good enough. This brings me neatly on to…
The shoot
Believe it or not, we filmed the project in our living room. I filmed a timelapse sequence (embedded here if you have Flash enabled) while we were setting up to rehearse.
I had investigated how one might achieve green-screen filming on a limited budget, and had a plan. A number of relatively cheap sources of green backgrounds exist; I spent about £25 on a fabric backdrop. It wasn’t the “proper” chroma key green as used by professionals but a more natural-looking dark green. (We found in rehearsal that the material was quite thin and the surface behind shone through slightly; we doubled the fabric over in the main shoot and hung it over a blanket, which helped.)
The critical part of chroma-key is getting the background as evenly lit as possible. Obviously, this is a lot easier with theatrical lanterns, diffusers and so on, but I had no such kit. Instead I had a few hints from folks across the net who had made do with work lights, so it was off to B&Q to get a couple. Having them pointing at acute angles across the background makes for a fairly even wash of colour with little gradienting and not much of a hot spot; even so, you can see from the still above that I had a dark spot in the bottom corner. This is OK, as you can mask regions out in the editor (that is to say, mark them as not part of the composition).
With the background lit, you also have to light your talent or they’ll appear largely in silhouette. Traditional wisdom on theatrical lighting says you should start out with a pair of warm-coloured lights on either side of your talent at about 45° so as to avoid harsh, sharp light leading to unwanted shadows. You also need to make sure they stand far enough in front of the backdrop (4-6 feet, says received wisdom) and are not so over lit that they cast shadows on it!
When you’re setting up you need to keep in mind what sort of a shot you want to achieve. In my case, in keeping with TV forecasts, this was a Mid Shot or thereabouts. It turned out to be quite tricky to achieve a wide enough shot with enough green background around me and still have the lighting OK - we ended up with the backdrop against one wall and the camera practically on the opposite.
Professional forecasters generally work with prepared slides but no script. My forecast was fully scripted, and I’m not a pro, so I wanted a cue to make sure I didn’t lose it. I set up my laptop adjacent to the camera, with the script in large type - Claire scrolled it as I went.
The on-board microphone on my camera was pretty awful, so I borrowed a pro-quality lapel mic from a friend and recorded directly into the laptop. We set it all running, I clapped my hands in lieu of a clapperboard, took a deep breath, and started reading the lines!
We filmed three takes in quick succession. We used the first one on the grounds that its pacing was best, and I didn’t fluff anything too badly. (Note to the nerds: there are two splices lurking for you to find.) Indeed, by the third take I was getting quite tired; I certainly wouldn’t have been able to rehearse and do a good job of the main take if we had done them all same-day.
Editing and assembly
Professional film-makers use decent commercial editing software like Final Cut or Premiere (which I remember getting to play with in high school, more years ago than I care to count). I was unwilling to spend that much on software just for a single project and so limited myself to the free software stable.
There were two plausible contenders, cinelerra and kdenlive. I can’t really recommend either as they both have some pretty serious issues at present. Cinelerra’s interface is horrible; the software is functional and powerful, but rather klunky and crashes sometimes for no apparent reason. Kdenlive crashes much less frequently, and has a much better interface, but has fewer features than cinelerra. In particular it did not allow me to preview the chroma key effect in real time as I tweaked the settings, which made it completely useless for that. (I did use it to assemble non-chromakey segments as it offered a much nicer experience than cinelerra.) It’s easy to see why people pay money for commercial software in this field.
Cinelerra comes with two chroma key plugins, one of which had more settings than the other. After messing around with the sliders I became disheartened and nearly gave up, but thankfully came across this handy guide on how best to tweak them. The result is not perfect - if you look closely you’ll see speckles on my shirt which momentarily key out! - but pretty decent given how uneven the background was.
Copyright
I wanted some weather-related photos to use as backdrops for a couple of slides, and some audio for the opening titles and closing credits. If you want to be squeaky clean and not risk a takedown notice, you’ve got to deal with the copyright properly: this means securing permission for every asset you incorporate. Most of the time such permission takes money, but there are an increasing number of people making their work available for free on condition that you credit them, often via one of the Creative Commons licenses.
I was unwilling to cede copyright control of the finished project, which meant that all assets with a CC-SA (“Share Alike”) license were off the table. Thankfully, it is possible to do a Flickr image search for photos with specific licenses, so I was able to proceed with sane search terms. Audio was a harder nut to crack, but I eventually found a couple of sites providing free royalty-free production music, from which I found some that evoked the right sort of mood (lots of horns - a similar sort of audio feel to the soundtrack of the LotR films). The icing on the cake was finding a breathtaking CC-BY photo of a misty mountain in Doubtful Sound in New Zealand which I used as the backdrop for the caving forecast.
(Somewhere in the copyright debate the notions of fair use and transformative work raise their heads. I don’t think they have been properly tested in court as yet; either way, this project claims neither.)
Title sequence (station ident)

TV stations brand themselves to their viewers with idents. Well, I thought, I’ve created a station here, so surely it ought to have an ident to use as an introduction to the film…
The idea for the WMTV ident came about almost by accident. When I was putting together the welcome slide for the forecast, I created this little WMTV logo to stick on the corner. I started out by playing with the letters W, M and E - “Western Middle-Earth” - and quickly came across the neat typographical wheeze of manually kerning the W and M to put them back-to-back. Then the opposing legs then cried out to be made vertical… After a couple of blind alleys trying and failing to work the E in there, I ended up colouring one green and one blue to represent the land and sea, added a T and a V, and there was my station’s logo!
How to turn this into an ident? The logo was sufficiently plain and simple that I reckoned I could model the lettering in 3d and do something interesting. Inspiration suddenly struck: put them on a black background, disassembling and reassembling themselves as a pastiche of the original Channel 4 (UK) idents of the 80s!
Actually modelling the pieces required me to gain at least a passing familiarity in how to use Blender. It let me import the 2d logo so I could trace over it and cut it up into pieces, which I then had it automatically extrude into 3d space with bevelled edges. Animating the pieces was a reasonably straightforward keyframe-driven job; I laid out keyframes for position and rotation of each piece individually, then tweaked them - and the lighting - until it looked good.
For the making of film above, I used the same objects and animation, but keyframing the camera as well. I made it go closer in and finally look back on the logo to convey the notions of “close-up” and “behind the scenes”.
Credits sequence
There wasn’t much to say, but I still needed to properly credit the incorporated stills and music, as well as hinting at how much work Claire and I had put in and declare my copyright on the finished product. I found myself googling up the BBC’s technical requirements for credits to see how they were typically done, as well as hints and tips from the ’net at large.
I prepared a single over-tall frame in Inkscape. The words are white text with a shadow effect over a pure green background which I would chromakey out later.
Cinelerra’s compositor is itself keyframe-driven. I used a static background photo of some clouds (another royalty-free-with-credit job) and had the wording slide move smoothly up it over a period of some seconds. After adjusting the transition to suit the length of the music, it looked OK, and that was that.
Summary: kit, budget and time
- Camera: My trusty Canon Digital IXUS 800IS (bought in 2006; max movie resolution 640x480, 30fps), atop my tripod.
- Green screen: 3m x 2.5m forest green from Budget Screens, £25. (I think with hindsight if there’s a next time I’d prefer a more saturated green, perhaps along the lines of the $50 offering from TubeTape.)
- Background lighting: two 120W halogen clamp worklights from B&Q, £13 each. (They came with lamp-protecting wire cages which I cut off as they cast odd shadows.)
- Talent lighting: another worklight I already had (albeit of an annoyingly different design and colour temperature), augmented by my tall IKEA floor lamp as a diffuse fill-in.
- Software: Inkscape, Cinelerra, kdenlive, Blender, Audacity, GIMP, FFmpeg; all free, running on Ubuntu 10.04.
Total money spent directly on this project: £50.98.
I’ve been asked how much time I spent on the project. Unfortunately, I didn’t think to keep timesheets, but here’s my best narrative guess:
- Pre-production - research, scripting and creating the slides - took maybe twenty or 25 evenings over a few weeks. (I’m not going to attempt to precisely quantify what an evening means, as it was quite variable.)
- Software familiarity was an issue, and if I were to do this again a lot of it would take less time. In particular I spent a day or two getting up to speed with cinelerra and figuring out how to drive its chromakey filters.
- Sourcing a budget green-screen took a few hours hours web-trawling, spread over several days.
- Early tests with the green screen and lights, and chroma-keying with them, took a couple of evenings.
- The rehearsal took an evening to set up, run through and tear down; cutting a test composite and appraising it for lessons to learn before the real shoot took another evening.
- The filming itself took another evening.
- Creating the ident took a couple of evenings.
- The credits took several tries to get right, so count another couple of evenings here.
- The main post-production - compositing in the slides and assembling the footage with the ident and credits - took another evening or so.
- Writing up these two articles and assembling the stills and footage for them has taken another three or four evenings ;-)
Adding these numbers up, with a suitably wet finger, I would hazard that it would compress into maybe 10-15 theoretical working days; second time around would be faster.
Afterword
I think that next time - if there is a next time! - I’ll probably shell out the cash for Premiere Elements or Final Cut Express. This is likely to result in much less gnashing of teeth, hair torn out, &c.