Next: Hypertext Extensions to LATEX Up: LaTeX2HTML Test Document Previous: Installation and Further Support Contents Index
There are several strategies available for the presentation of mathematics according to the desired version of HTML. These are discussed in some detail. Environments such as figure, table, tabular and minipage have special features. Other supported packages are listed.
Sometimes it is known that the audience, for which a specific document
is intended, has limited browser capabilities.
Or perhaps special extended capabilities are known to be available.
The LATEX2HTML translation may be customised to suit the
available functionality.
Other HTML versions and extensions
supported by LATEX2HTML are described below.
See the description of the -html_version command-line
option switch.
Not all of the symbols are available in TEX, LATEX2HTML, or any browser yet available. However the `i18n' extension to LATEX2HTML is in preparation for when such browsers do become available, and such characters will be required in Web-accessible documents.
There has been a recent proposal for a Mathematical Markup Language (MathML) from the W3C Math Working Group. This would suggest that the HTML-Math model is unlikely ever to be adopted; better things being expected in the near future using MathML.
See also another page for a discussion the the mechanisms available with LATEX2HTML for handling mathematical equations and expressions.
$LANGUAGE_TITLES = 'french';will cause LATEX2HTML to produce “Table des matières” instead of “Table of Contents”. Furthermore, the value of the \today command is presented in a format customary in that language.
Languages currently supported are
finnish, french, english, german
and spanish.
It is trivial to add support for another language by creating a file
in the styles/ subdirectory,
or by adding to the file latex2html.config.
As a guide, here is the entry for French titles:
sub french_titles {
    $toc_title = "Table des mati\\`eres";
    $lof_title = "Liste des figures";
    $lot_title = "Liste des tableaux";
    $idx_title = "Index";
    $ref_title = "R\\'ef\\'erences";
    $bib_title = "R\\'ef\\'erences";
    $abs_title = "R\\'esum\\'e";
    $app_title = "Annexe";
    $pre_title = "Pr\\'eface";
    $fig_name = "Figure";
    $tab_name = "Tableau";
    $part_name = "Partie";
    $prf_name = "Preuve";
    $child_name = "Sous-sections";
    $info_title = "\\`Apropos de ce document...";
    @Month = (”, 'janvier', "f\\'evrier", 'mars', 'avril', 'mai',
              'juin', 'juillet', "ao\\^ut", 'septembre', 'octobre',
              'novembre', "d\\'ecembre");
    $GENERIC_WORDS = "a|au|aux|mais|ou|et|donc|or|ni|car|l|la|le|les"
        . "|c|ce|ces|un|une|d|de|du|des";
}
Notice how the backslash needs to be doubled, when a macro is needed
(for accented characters, say).
Also, the $GENERIC_WORDS are a list of short words to be excluded
when filenames are specially requested to be created from section-headings.
In order to provide full support for another language you may also
replace the navigation buttons which come with LATEX2HTML
(by default in English) with your own.
As long as the new buttons have the same file-names as the old ones,
there should not be a problem.
LATEX2HTML can handle input files in other encodings, indicated by including the inputenc package in the source:
\usepackage[latin5]{inputenc}
In this case, LATEX2HTML will produce output in the
same encoding, and will indicate the encoding in the HTML
headers.
The input encodings that are recognised are listed in
the following table.
|
Another way to present multiple languages within a Web document is to create images of individual letters, words, sentences, paragraphs or even larger portions of text, which cannot be displayed within the chosen font-encoding. This is a technique that is used with IndicTEX/HTML, for presenting traditional Indic language scripts within Web pages. For these the LATEX source that is to be presented as an image needs special treatment using a “pre-processor”. For the special styles defined in IndicTEX/HTML, running the preprocessor is fully automated, so that it becomes just another step within the entire image-generation process.
The technique of using images, can be used with any font whose glyphs can be typeset using TEX or LATEX. Using TEX's \font command, a macro is defined to declare the special font required; e.g. for Cyrillic characters, using the Univ. of Washington font:
\font\wncyr = wncyr10
Now use this font switch immediately surrounded by braces:
published by {\wncyr Rus\-ski\char26\ \char23zyk}.
to get:
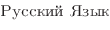 .
.
Using the -no_math switch is best for having a consistent style used for all mathematical expressions, whether inline or in displays. The images are of especially good quality when “anti-aliasing” is being used (see here), provided the browser is set to have a light background colour. (When set against a gray or dark background, these images can become rather faint and hard to read.)
The final strategy above, using -no_math is the preferred method for good quality mathematics with HTML version 3.2 . It combines the browser's built-in fonts with the best quality images, when needed. To obtain it use the command-line option switches:
-no_math -html_version 3.2,mathThis is what was used when creating this manual. Examples below show how to generate an image of a whole environment, even with these options in force.
Since the HTML 2.0 standard does not include
superscripts and subscripts, via the <SUP> and <SUB> tags,
the options are more limited. In this case creating images of sub-expressions
is not so attractive, since virtually the whole expression would
consist of images in all but the simplest of cases.
|
Here are some examples of mathematical expressions and environments processed by LATEX2HTML using different strategies. They are automatically numbered ...
... with some gratuitously ácçënted text in-between ... + +  |
|||
+  = - Il, m, n(v) . = - Il, m, n(v) . |
(2) |
Notice how
simple alphabetic characters that are not part of fractions appear
in the (italiced) text-font selected using the browser's controls.
This may appear slightly different from the same symbol being used
within a fraction, or other mathematical construction requiring an image
to be generated. This is most apparent with the letter `h' in the
first equation and the subscripts at the end of the second equation.
By inserting an \htmlimage{} command into a math,
equation or displaymath environment, a single image
will be created for the whole environment. For an eqnarray
environment, this will lead to having a single separate image
for each of the aligned portions.
The argument to \htmlimage need not be empty, but may contain
information which is used to affect characteristics of the resulting
image. An example of how this is used is given below,
and a fuller discussion of the allowable options is given in
the next section.
Note: To generate anti-aliased images using Ghostscript requires version 4.03 or later.
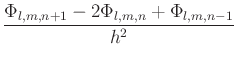
These images of the whole environment were created using the \htmlimage command, to suppress the extended parsing that usually occurs when the `math' extension is loaded; viz.
\begin{equation}
\htmlimage{no_antialias}
\Phi_{l+1,m,n} = \Bigl(\Phi+h\frac{\partial\Phi}{\partial x} +
...
\end{equation}
%
\begin{eqnarray}
\htmlimage{}
\frac{\Phi_{l+1,m,n}-2\Phi_{l,m,n}+\Phi_{l-1,m,n}}{h^{2}} +
...
\end{eqnarray}
Further aspects of the options available when generating images
are discussed in the next section, in particular
with regard to the quality of printed images.
Normally \mbox is used to set a piece of ordinary text within a
mathematics environment. It is not usual to have math delimiters
$...$ or \(...\) within the argument of an \mbox.
Whereas earlier versions of LATEX2HTML simply ignored the \mbox
command (treating its argument as normal text),
the presence of such delimiters now results in an image being
generated of the entire contents of the \mbox.
It is not necessary for there to be any actual mathematics inside
the \mbox's contents;
e.g. \mbox{...some text...${}$}
will cause an image to be created of the given text.
]{<width>}{<text>}
command also generates an image of its contents,
except when used within a tabular environment, or other
similar table-making environment.
Here the important aspect is the width specified for the given
piece of text, and any special line-breaks or alignments that
this may imply. Hence to get the best effect, LATEX is used
to typeset the complete \parbox, with its specified width,
alignment and contents, resulting in an image.
The \nonumber command is recognised
in each line of the equation array, to suppress the equation number.
A side-effect of this approach is that equation numbers will
appear on the left side of the page.
The heqn package requires the html package.
Using HTML Version 3.2 the heqn package is quite redundant, since equation numbers are placed in a separate <TABLE> cell to the mathematical expressions themselves. It is not required and should not be requested, since this will override some of the improved functionality already available.
These parameters apply only to bitmapped image types,
and have no effect with the default SVG image type.
The size of all “small images” depends on a configuration variable
$MATH_SCALE_FACTOR which specifies how much to enlarge or
reduce them in relation to their original size in the PostScript
version of the document.
For example a scale-factor of 0.5 will make all images half as big,
while a scale-factor of 2 will make them twice as big.
Larger scale-factors result in longer processing times and larger
intermediate image files. A scale-factor will only be effective
if it is greater than 0.
The configuration variable $FIGURE_SCALE_FACTOR performs
a similar function for “figures”.
Both of these variables are initially set to have value 1.
A further variable $DISP_SCALE_FACTOR is used with `displayed math' equations and formulas; this value multiplies the $MATH_SCALE_FACTOR to give the actual scaling used. Values greater than 1 can be used to counteract readability problems with bitmapped images. Accordingly this manual actually uses values of 1.4 and 1.2 respectively, for $MATH_SCALE_FACTOR and $DISP_SCALE_FACTOR. These go well with the browser's text-font set at 14 pt. The next larger size of 17 pt is then used for the <LARGE> tags in displayed equations.
A further variable $EXTRA_IMAGE_SCALE allows images to be created at a larger size than intended for display. The browser itself scales them down to the intended size, but has the extra information available for a better quality print. This feature is also available with single images. It is discussed, with examples, on the next page.
If an \htmlimage command appears within any environment for which creating an image is a possible strategy (though not usual, due to loading of extensions, say), then an image will indeed be created. Any effects requested in the <options> argument will be used. Having empty <options> still causes the image to be generated.
This ability has been used within this manual, for example with the mathematics images in the previous section.
The <options> argument is a string separated by commas.
Allowable options are:
The `middle' option specifies that the image is to be left-justified in the line, but centered vertically. The `center' option specifies that it should also be centered horizontally. This option is valid only if the HTML version is 3.0 or higher. The default alignment is `bottom'.
Note: images whose sizes are modified in this way may not be acceptable for image-recycling. Instead they may need to be generated afresh on each run of LATEX2HTML through the same source document.
In order to be effective the \htmlimage command
and its options must be placed inside the environment
on which it will operate.
Environments for alignment and changing the font size do not
generate images of their contents. Any \htmlimage
command may affect the surrounding environment instead;
e.g. within a table or figure environment,
but does not apply to a minipage.
When the \htmlimage command occurs in an inappropriate place, the following message is printed among the warnings at the end of processing. The actual command is shown, with its argument; also the environment name and identifying number, if there is one.
The command "\htmlimage" is only effective inside an environment
which may generate an image (e.g. "{figure}", "{equation}")
 center92: \htmlimage{ ... }
\begin{figure}
    \htmlimage{thumbnail=0.5}
    \htmlborder{5}
    \centering \includegraphics[width=5in]{psfiles/figure}
    \latex{\addtocounter{footnote}{-1}}
    \caption{A sample figure showing part of a page generated by
       \latextohtml{} containing a customised navigation panel
       (from the
        CSEP project).}\label{fig:example}
\end{figure}
![\begin{figure}\centering\includegraphics[width=5in]{psfiles/figure}
%
\end{figure}](img16.png) |
The \htmlimage command is also often useful to cancel-out the
effect of the configuration variable $FIGURE_SCALE_FACTOR.
For example to avoid resizing a color screen snap despite
the value of $FIGURE_SCALE_FACTOR it is possible to
use \htmlimage{scale=0} .
All types of images can be shared. These include “small images”
and figures with or without thumbnails
and image-maps.
Furthermore, most images can also be reused. The only
exception are those which are order-sensitive,
meaning that their content depends upon their location.
Examples of order-sensitive images are equation
and eqnarray environments,
when -html_version 2.0 has been specified;
this is because their figure numbers are part of the image.
Figures and tables with captions, on the other hand, are order-insensitive because the figure numbers are not part of the image itself.Similarly when HTML 3.2 code is being produced, equation numbers are no longer part of the image. Instead they are placed in a separate cell of a <TABLE>. So most images of mathematical formulas can be reused also.
On-screen these images appear slightly blurred or indistinct. However there can be marked improvement in the print quality, when printed from some browsers; others may show no improvement at all. The “anti-aliasing” helps on-screen. In the printed version jagged edges are indeed softened, but leave an overall fuzziness.
Here are the same equations yet again; this time with `extrascale=2.0'. Now there are 4 times the pixels at a cost of roughly 2.45 times the disk space. Compared with the previous images (having 1.5 times extra-scaling), there is little difference in the on-screen images. Printing at 300 dpi shows only a marginal improvement; but at 600 dpi the results are most satisfying, especially when scaled to be comparable with normal 10 pt type.
When the common version of HTML was only 2.0, then almost all complicated environments were represented using images. However with HTML 3.2, there is scope for sensible layout of tables, and proper facilities for associating a caption with a figure or table. To take advantage of this, the figure environment now has its contents placed within <TABLE> tags; any caption is placed as its <CAPTION>.
For consistency with former practice, the contents of the figure environment are usually represented by generating an image. This is frequently exactly what is required; but not always. In another section it is described how to use the makeimage environment, defined in the html.sty package, to determine just which parts (if any) of a figure environment's contents should be made into images, the remainder being treated as ordinary text, etc.
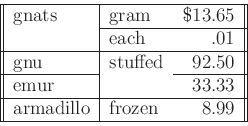
Similarly the makeimage environment can be used within a table, though usually this is used with a tabular or other table-making environment, such as tabbing or longtable or supertabular. Here is a simple example, from the LATEX `blue book'.
When using -html_version 2.0 to get code compatible
with the HTML 2.0 standard, an image is made of the
table, as follows:
The special feature of minipage environments is in the way \footnote and \footnotemark commands are handled. These are numbered separately from the rest of the footnotes throughout the document, and the notes themselves are collected together to be displayed at the end of the minipage's contents.
| ||||||||||||
The code used for this example was as follows6
\begin{minipage}{.9\textwidth}
\renewcommand{\thempfootnote}{\alph{mpfootnote}}
\begin{tabular}{|l|l|} \hline
\textbf{Variable} & \textbf{Meaning} \\ \hline
none      & none                   \\
Jacobi    & $m$-step Jacobi iteration\footnote[1]{one footnote} \\
SSOR      & $m$-step SSOR iteration\footnotemark[1] \\
IC        & Incomplete Cholesky factorization\footnote[2]{another footnote} \\
ILU       & Incomplete LU factorization\footnotemark[2] \\ \hline
\end{tabular}
\end{minipage}
Warning:
With some figures, especially when containing graphics imported using
\includegraphics or other special macros, the background color
may come out as a shade of grey, rather than white or transparent.
This is due to a setting designed to enhance anti-aliasing of text
within images; e.g. for mathematics.
To alleviate this possible problem, the -white command-line option
can be used, to ensure a white background for images of figure
environments.
Alternatively, set the $WHITE_BACKGROUND
variable.
These differences are achieved using a mechanism that automatically loads a file: article.perl, report.perl, book.perl, letter.perl, slides.perl according to the requested document-class. These files contain Perl code and are located in the styles/ directory. If a file of the same name exists in the working directory, this will be loaded instead.
Typically such files <class>.perl contain code to define subroutines or sets values for variables that will affect how certain translations are performed. There can be code that is executed only when specific class-options are specified along with the chosen document-class. For example, the foils.perl implementation of FoilTeX's foils class defines code create a new sub-section for each `foil'. It also has code which allows LATEX2HTML to ignore those of FoilTeX's special formatting commands that have no relevance when constructing an HTML page.
Any options given on the \documentclass or \documentstyle line may also cause a file containing Perl code to be loaded. Such a file is named <option>.perl for the appropriate <option>. When such a file exists, in the local directory or in the styles/ directory, it typically contains Perl code to define subroutines or set values for variables that will affect how certain translations are performed. There can be code that is executed only for specific document-classes.
Since the files for class-options are loaded after those for the document-class, it is possible for the <option>.perl file to contain code that overrides settings made within the document-class file.
If a file named <class>_<option>.perl happens to exist for
a given combination of document-class <class> and class-option <option>,
then this will be loaded.
When such a file exists, reading and executing its contents is done,
rather than executing any <class>_<option> specific information
that may be contained in <class>.perl or <option>.perl .
Currently there are no special option or class-option files provided with
the LATEX2HTML distribution. It is hoped that users will identify ways
that specific features can be improved or adapted to specific classes of documents,
and will write such files themselves, perhaps submitting them for general distribution.
Note:
This mechanism for handling code specific to different document classes
and class-options is more general than that employed by LATEX2e.
New options can be defined for document-classes generally, or for specific classes,
without the need to have corresponding .sty or .clo files.
LATEX simply notes the existence of unusupported options—processing is not
interrupted.
This mechanism helps to keep the core script smaller, as well as making it easier for others to contribute and share solutions on how to translate specific style-files. The current distribution includes the files to support the styles listed in the table below. These provide good examples of how you can create further extensions to LATEX2HTML.
| .perl file | Description |
| alltt | Supports the LATEX2e's alltt package. |
| amsfonts | provides recognition of the special AMS font symbols. |
| amsmath | same as amstex.perl. |
| amssymb | same as amsfonts.perl. |
| amstex | Supports much of the AMS-LATEX package (not yet complete). |
| babel | Interface to german.perl via the babel package. |
| changebar | Provides rudimentary change-bar support. |
| chemsym | defines the standard atomic symbols. |
| color | Causes colored text to be processed as ordinary text by LATEX2HTML. |
| colordvi | supports the Crayola colors. |
| enumerate | supports structured labels for enumerate environments. |
| epsbox | Processes embedded figures not enclosed in a figure environment. |
| epsfig | Processes embedded figures not enclosed in a figure environment. |
| finnish | Support for the Finnish language. |
| floatfig | Processes floating figures. |
| floatflt | Processes floating figures and tables. |
| foils | Supports FoilTeX system. |
| frames | Provides separate frames for navigation and footnotes. |
| francais | Support for the French language, same as french.perl. |
| french | Support for the French language. |
| german | Support for the German language. |
| germanb | Support for the German language, same as german.perl. |
| graphics | Supports commands in the graphics package. |
| graphicx | Supports the alternate syntax of graphics commands. |
| harvard | Supports the harvard style of citation (same as fnnharvard.perl). |
| heqn | Alters the way displayed equations are processed. |
| hthtml | gives an alternative syntax for specifying hyperlinks, etc. |
| htmllist | Provides support for fancy lists. |
| justify | supports paragraph alignment—no longer needed. |
| latexsym | supports the LATEX symbol font. |
| lgrind | macros for nice layout of computer program code. |
| longtable | supports use of long tables, as a single table. |
| makeidx | provides more sophisticated indexing. |
| multicol | suppresses requests for multi-columns. |
| natbib | Supports many different styles for citations and bibliographies. |
| nharvard | Supports harvard-style citations, using natbib. |
| seminar | for creation of overhead-presentation slides. |
| spanish | Support for the Spanish language. |
| supertabular | supports use super-tables, as an ordinary table. |
| texdefs | Supports some raw TEX commands. |
| verbatim | Supports verbatim input of files. |
| verbatimfiles | Supports verbatim input of files, also with line-numbering. |
| wrapfig | Supports wrapped figures. |
| xspace | Supports use of the xspace package and \xspace command. |
| xy | Supports use of the XY-pic graphics package. |
\htmlitemmark command, which provides an alternative
means of choosing the item-mark, and allows the image to be changed
for different items in the list.
The mark is determined
by the \htmlitemmark{<item-mark>} command.
This command accepts either a mnemonic name for the <item-mark>,
from a list of icons established at installation, or the URL of a mark
not in the installation list.
The command \htmlitemmark must be used inside the
htmllist environment in order to be effective,
and it may be used more than once to change the mark within the list.
The item-marks supplied with LATEX2HTML are
BlueBall, RedBall, OrangeBall, GreenBall,
PinkBall, PurpleBall, WhiteBall and YellowBall.
The htmllist environment is identical to
the description environment in the printed version.
An example of its usage is:
\begin{htmllist}[WhiteBall]
\item[Item 1:] This will have a white ball.
\item[Item 2:] This will also have a white ball.
\htmlitemmark{RedBall}%
\item[Item 3:] This will have a red ball.
\end{htmllist}
One can also obtain LATEX2e style-files floatfig.sty and
wrapfig.sty, which provide support for the floatingfigure
and wrapfigure environments, respectively. These environments
allow text to wrap around a figure in the printed version,
but are treated exactly as an ordinary figures in the electronic version.
They are described in The LATEX Companion.
]{foils} in the
images.tex file is substituted by the header
\documentclass[$FOILOPTIONS]{$FOILCLASS},
where the variables $FOILOPTIONS and $FOILCLASS can be set
in the configuration file (by default they are '10pt' and
'article' correspondingly).
A further variable $FOILHEADLEVEL holds the level of sectioning
at which a `foil' is to correspond; the default level is 4 (sub-section).
The LATEX style file foilhtml.sty in the texinputs/ directory provides some additional features for FoilTeX. It implements structural markup commands like \section, \tableofcontents for foils. See the directory docs/foilhtml/ for the details.
Within the LATEX version of this manual two thicknesses of change-bar
have been used. Thicker bars indicate changes introduced with version V97.1 ,
while thinner bars indicate earlier additions since V96.1 .
Within the HTML version the change-bars clearly indicate the
different revisions with explicit numbering.Within the HTML version, the graphic icons representing
the changebars can be followed by some text indicating the new version.
This is used repeatedly throughout
this manual. It is achieved using the command
\cbversion{<version>}, immediately following
the \begin{changebar}.
This sets a variable $cb_version to be used both at the beginning
and end of the environment. The value of this variable is retained,
to be used with other changebar environments, unless changed explicitly
by another occurrence of $cb_version.
Warning: LATEX2HTML will not correctly process changebar environments that contain sectioning commands, even when the (sub)sections or (sub)paragraphs are to occur on the same HTML page. If this is required, use a separate changebar environment within each (sub)section or (sub)paragraph.
More sophisticated indexing is available by loading the makeidx package. Most of the features described in [1, Appendix A] become available. This includes:
\index{<sort-key>@<styled-text>}
produce <styled-text> as the entry, but sorted according to <sort-key>.
\index{<item>!<sub-item>}
set the <sub-item> indented below the <item>.
Unlimited levels of hierarchy are possible,
even though LATEX is limited to only 3 levels.
The <sort-key>@<styled-text> can be used at each level.
\index{latexe@\LaTeXe |see{\htmlref{\LaTeX}{IIIlatex}}}
where a \label has been specified in some other index-entry, as follows:
\index{latex@\LaTeX\label{IIIlatex}}
|
(e.g. \index{A| })
places a blank line before the index entry and omits the hyperlink.
This is used mainly for visual formatting; it allows a break before the entries
starting with each letter, say. Using a printable-key, as in \index{Q@Q, R| },
is appropriate when there are no indexed words starting with `Q', say.
"@, "|, "!
and also "" for the quote character itself.
Also \" produces an umlaut accent on the following character,
when appropriate, else is ignored.
Furthermore, the printable part of an index entry can contain HTML
anchors; that is, hyperlinks and/or \label{...}s.
This allows index entries to contain cross-links to other entries, for example,
as well as allowing index-entries to be the target of hyperlinks from elsewhere
within the document.
The next section describes how this feature is used within this manual to create a Glossary, containing a short description of all file-names, configuration-variables and application software mentioned within the manual, integrated with the Index. All occurrences of the technical names can be easily found, starting from any other.
When a single item is indexed many times, it is sufficient
to have a \label command appearing within the printable portion
of the first instance of an \index{...} command for that item,
within a single document segment.
If the index-entries are in different segments of a segmented document,
it is sufficient to have the \index{...@...\label{...}} appearing
within that segment, in which the item is indexed, whose indexing information
is loaded earliest via a \internal[index]{...} command.
When in doubt, include one \index{...@...\label{...}} per segment
in which the item is indexed.
For cross-links to work effectively within segmented documents,
the indexing command
\index{...@...\label{...}} must occur earlier
in the same segment than any use of
\index{...@...\htmlref{...}{...}}
intended to create a link to that label.
If the \label occurs in a different segment,
then a \internal[index]{...} command for that segment,
may be needed at the beginning of the segment with the \htmlref .
When this is done incorrectly, the resulting link will be to the
segment where the indexed item occurred,
rather than staying within the Index.
Since use of section-names, as the text for hyperlinks, can lead to a very long and cumbersome Index, especially when single items have been indexed many times, a further feature is provided to obtain a more compact Index.
Use of the command-line option -short_index causes a codified
representation of the sectioning to be used, rather than the full section-name.
The differences are as follows.
^'.
A large number of different pieces of software are required to make LATEX2HTML work effectively, as well as many files containing data or code to work with parts of this software. For this reason, a Glossary is included with this manual. It contains the names of all files, configuration variables, application software and related technical terms, with a short description of what it is, or does, and perhaps a URL for further reference.
In the printed version each item in the Glossary is accompanied by the page-numbers
on which the item is mentioned, somewhat like in the Index.
For the HTML version, each glossary-item contains a hyperlink to an
index-entry, which then has links to each occurrence.
These extra index-entries do not appear in the printed version;
indeed they also contain a hyperlink back to the corresponding glossary-entry.
This feature is currently available only when using the makeidx package, and needs also the html and htmllist packages. It was developed for version 96.1f by Ross Moore, incorporating an extensive revision of makeidx.perl, as well as additions to LATEX2HTML so that all aspects of indexing work correctly with segmented documents.
Since LATEX provides no guidelines for how a Glossary should be constructed,
the technique used here will be explained in detail, for both the printed and
HTML versions.
\glossary{...} command within a file manual.glo.
This command is redundant in the HTML version, so is given a trivial definition which is ignored by LATEX.
\fn{html.sty}, \fn{dvips}, \appl{dvips} etc.
which both insert the text and create the glossary-entry; viz.
\newcommand{\fn}[1]{\htmlref{\texttt{#1}}{GGG#1}\glossary{#1}}
\newcommand{\appl}[1]{\htmlref{\textsl{#1}}{GGG#1}%
  \Glossary{#1}{\textsl{#1}}}
\def\glossary#1{\index{#1@\texttt{#1} \label{III#1}%
  \htmlref{(G)}{GGG#1}}}
\def\Glossary#1#2{\index{#1@{#2} \label{III#1}\htmlref{(G)}{GGG#1}}}
\def\makeglossary{}
...while in LATEX we need only:
\newcommand\Glossary[2]{\glossary{#1@#2}} .
Notice how the feature of makeidx, allowing the printable portion to be separate from the sorting-key, is used to allow text-styles to be included within both index-entries and glossary-entries. Indeed the purpose of \Glossary is to allow deviations from a fixed style, e.g.
\newcommand{\MF}{\htmlref{\textsl{Metafont}}{GGGmetafont}%
  \Glossary{metafont}{\textsl{Metafont}}}%
Also notice that in the HTML version an index-entry is created that
includes, within its printable portion, both a \label and a hyperlink.
The former, having name III..., will ultimately reside on the Index page,
while the latter will point to an anchor named GGG... on the Glossary page.
These names must be distinct from any other names used with \labels
elsewhere in the document, hence the use of prefixes III and GGG.
A short string `(G)' is used for the text of the hyperlink in the Index.
\end{htmlonly}
\section*{Glossary of variables and file-names\label{Glossary}}
\begin{htmllist}\htmlitemmark{OrangeBall}
  \input l2hfiles.dat
\end{htmllist}
For this reason alone it is desirable to have l2hfiles.dat sorted alphabetically.
LATEX constructs its Glossary by running the makeindex utility on the file manual.glo, using the following command:
makeindex -o manual.gls -s l2hglo.ist manual.gloIts output, which includes page numbering for an index, is stored in manual.gls and subsequently read by LATEX using:
\InputIfFileExists{manual.gls}{\clearpage\typeout{^^Jcreating Glossary...}}
{\typeout{^^JNo Glossary, since  manual.gls  could not be found.^^J}}
The configuration file l2hglo.ist is included along with this manual. It contains a portion that inserts tricky TEX code at the beginning of manual.gls. This code extracts from l2hfiles.dat that line corresponding to each glossary entry, then typesets it itemized within an environment called theglossary.
\newenvironment{theglossary}{\begin{list}{}{%
  \setlength{\labelwidth}{20pt}%
  \setlength{\leftmargin}{\labelwidth}%
  \setlength\itemindent{-\labelwidth}%
  \setlength\itemsep{0pt}\setlength\parsep{0pt}%
  \rmfamily}}{\end{list}}
Currently searching within l2hfiles.dat is only done sequentially, stopping
at the end of the file. If an entry is not found then it is skipped and a message
printed to the log; the next entry will search from the top of the file.
If all entries are included and maintained in strict order, there will be no skipping
and each line of l2hfiles.dat is read exactly once.
\item[\gn{french.perl}] adds \Perl{} code to be compatible with the ...
\item[\gn{\textsl  {ftp}}] `File Transfer Protocols', network ...
\item[\gn{german.perl}] adds \Perl{} code to be compatible with the ...
...
For the LATEX version the \item[\gn{...}] is only used for pattern-matching,
to find the correct data entry.
All typesetting is controlled from within manual.gls.
However the HTML version requires the following definition:
\newcommand{\gn}[1]{\texttt{#1}\label{GGG#1}\htmlref{\^}{III#1}}%
which establishes the hyperlink to the Index, marked by `^',
and provides the \label to create the target in the Glossary
for any \glossary{...} command having the corresponding argument. Φ + h
Φ + h +
+  h2
h2 +
+  h3
h3 + …
+ …