These instructions will guide you through installing a new LCD panel in your A4's lid. Please read them through before you start. You will need a crosshead screwdriver (2-3mm diameter), a similar flathead screwdriver, and devices for levering (eg thin flathead screwdrivers or a craft knife with a strong blade, preferably blunt). The watchword for this procedure is be gentle - everything is made of plastic, so will snap if you apply too much force.
- Configure your A4 to use the LCD display (with !Configure or *Configure MonitorType 5). Shut it down, remove all cables and the battery.
- Flip out the Econet interface/blanking plate to the rear of the keyboard. You should see two flat white screen cables coming from the screen and plugging into the motherboard. Using a screwdriver, gently push up the left and right sides of the top of the connector, which after both sides are unclipped should slide up about 1mm with a gap between it and the bottom part of the connector. Then the screen cables should come away very easily - if they don't, don't force them, but work on unclipping the connector as above.
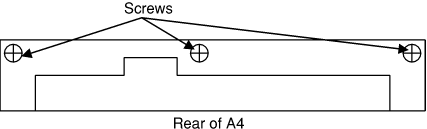
- Remove the three rear screws:
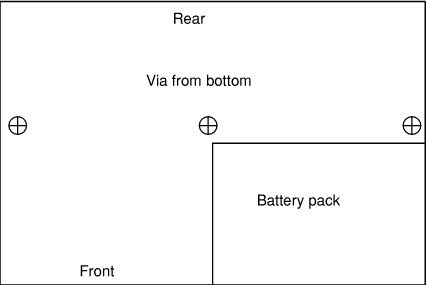
- Remove the three base screws:
- Take away the lid assembly, and put the rest of the A4 to one side. If at all possible, keep the lid flat on a surface now, since once the front cover is removed the hinge may fall apart if you tip it forward.
- Working on the lid, if the hinge has grey circular plastic caps on it, prise them off to reveal the screwhead beneath. Unscrew the hinge screws, and pull them out slightly, but don't remove them.
- Find the square light grey clips at the top corners of the lid. These have a clip at their inner edges, so carefully prise them away (suggested from the outer edges) and remove them.
- Unscrew the two screws thus revealed.
- Unclip the two clips between top and bottom halves of the lid that can be seen at the hinge edge. Avoid removing the hinge screws completely, as two metal tabs fall out which are a pain to get back - but this may be necessary if you can't get to the clips without detaching the top cover of the A4 body. A tiny amount of Blu-tack helps hold them in place during refitting if they are removed.
- Starting from the hinge, run screwdriver(s) along the outer edge of the lid, gently lifting the front cover. The top and sides of the lid are one panel, and the front cover sits inside them flush to the sides - it may be difficult to see the join, but if starting from the hinge should lift it enough to lever it (or use screwdrivers/toothpicks to stop it dropping back into place). There are no clips here other that those released in the previous step, so the cover is held on by friction - once all sides are released it will easily lift off. Do this carefully to avoid bending the cover. Don't attempt to lever against the brightness/contrast knobs, as they will snap - the knobs will stay in place once the top cover is removed. If the LCD is attached to the front cover, carefully push it out from the front so that it is separated, and leave it to rest in the back cover.
- Identify the sockets where the two cables from the screen PCB plug into
the backlight PCB. These are like the motherboard screen cable sockets but
flat against the board, not vertical. Carefully prise off the covers from
the sockets by pushing the rightmost half of the socket further to the
right, and remove the cables - don't force them. The rightmost half of
these covers hinge upwards from the centre when the cables are released.

- Remove the old LCD. It may be lightly stuck or wedged in, but don't use too much force in removing it.
- Remove the protective film from the back of the new LCD, and place it into position (preferably with something lint-free, to avoid fingerprints). Try not to touch or handle the screen by the external electronics - whereever possible hold it by the screen itself. Once in place, remove the front film, and any tape holding the cables to the screen coming (don't touch what looks like tape with a blue line on the ends of the cables).
Push the cables into the sockets on the backlight PCB - they should show no more than 1mm of uninsulated silver foil sticking out of the connector - if more than this shows, pull the hinge on the cover up and push the cable in, making sure not to force it. Push down on the sockets to grip the cables, so that the hinge is flush with the rest of the socket.
If you want to check everything is OK at this point, reconnect the cables from the backlight PCB to the motherboard. You may need to place a book or other object to support the screen close enough to the A4 for the cables to reach - don't stretch them. Switch on the A4. If all has gone well, as the A4 boots, the screen should come on and work as expected (you may have to adjust the brightness/contrast knobs to see it).
If it doesn't work, check the cables are plugged in. The rearmost cable on the motherboard drives the LEDs and LCD power supply, so if that is not connected properly, you will see no LEDs light. If the LEDs light, but there's no LCD activity, check the backlight is on (the white tube down the left hand side of the screen). If the backlight is off, this could either be caused by the frontmost motherboard cable being loose, or the A4 not configured to use the LCD (try switching on the machine with 5 held down, leaving it held for about 20 seconds). If the backlight is on, check the LCD is correctly plugged into the backlight PCB (switch the machine off before doing any of these checks).
Unclip the screen cables from the motherboard as before, and reverse these instructions to reassemble the machine. The front panel should press into the lid (if it doesn't, ensure the LCD is sitting correctly), and the hinge clips engage. Check around the glass on the LCD and make sure that no part of it is sitting on top of the L-shaped plastic guides, or you'll end up breaking the LCD when you re-fit the cover. If you haven't removed the hinge screws, they should screw back with too much difficulty - but can be fiddly if parts have fallen out. Reclip the screen cables to the motherboard, and turn the machine on to check the LCD again.
You should now have an A4 with a new working screen!
Paul adds:
When it came to putting my A4 back together, the tubes and nuts (those fiddly bits) which hold the screen to the A4 were playing silly buggers and didn't want to go back. I resorted to the following method instead which was suprisingly simple.
With the main screen portion (without the front panel), connect with the side-screws through the main hinged slots as this will allow for simple threading of the tubular washers and fulcrum-nuts. Tighten slightly then start to press back in, the front panel starting from the bottom-right-hand-side and working anti-clockwise but being careful when you reach the portion where the screen-adjust button-holes are located.
Eventually, you'll end-up with the bottom section lifted ever-so-slightly so now concentrate by lifting slightly the front-facia (in the hole for the screen) and the bottom clips will engage. Don't excert too much pressure here otherwise you'll crack the panel.
When completed, adjust the tightness of the two hinge screws so that it's a little still when opening/closing the screen.
Finaly insert and tighten the top two silver panel screws and then put back the plastic covers removed in the earlier step.'
Anyway Theo, this was the way I did it and it saved an awful lot of blue-tac and time.
Page by Theo Markettos (email at theo [at@] markettos.org.uk), last modified 2005-08-17
Return to A4 page.