How To Park The Heads On Your PERQ 1
The Shugart 14 inch hard disk used in the PERQ 1 has a somewhat arcane
procedure for parking the hard disk heads for transport.
To help you locate the various screws and plugs, here's an annotated
diagram of the hard disk:
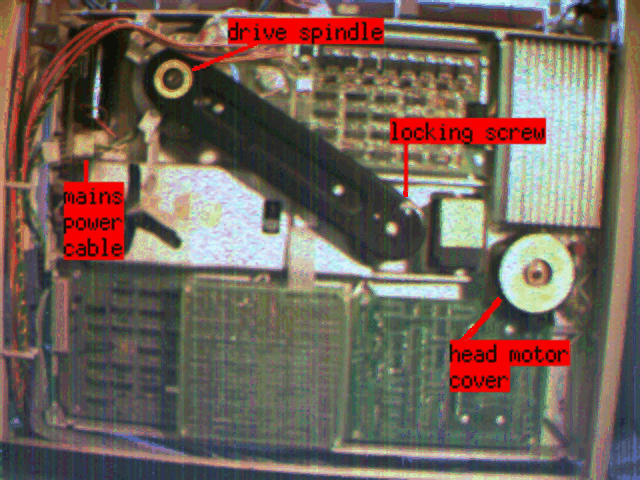
(To give non-PERQ owners some idea of the scale, the disk unit in
this image is about 2 ft tall. This is the back of the disk. The platters
are mounted vertically in the plane of the photo.)
- Unplug the PERQ from the mains! This is very important - the PERQ 1
has live mains in numerous places in the cabinet...
- Remove the front and rear plastic panels (4 screws each).
Remove the left (looking at the PERQ from the front) side panel (2 screws).
- Now is a good time to find the locking screw and head clamp. The
locking screw is of the sort that requires an Allen key to turn; if you've
lost it it can be replaced by any screw that fits. The head clamp is an
A-shaped piece of black plastic.
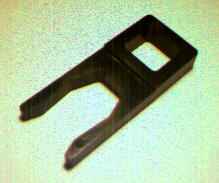
It is traditionally kept inside the PERQ
somewhere, perhaps taped to the hard disk or on the floor at the front
of the cabinet.
- Plug in the PERQ again. Watch out for all those live parts!
Now pull out the white interlock buttons at front and rear, and power
up the machine via the switch at the front.
- Boot POS, and log in. Enter the command
BYE /WAIT and wait
for the heads to position themselves in the correct place. The PERQ
will tell you that you can turn it off now, but do not do this.
Instead, locate the gap in the cover on the head motor:
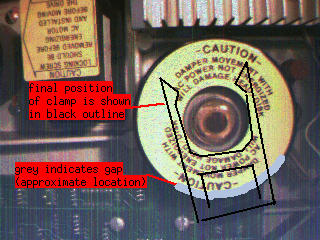
(I apologise profusely for the shoddy overlaid artwork!)
and carefully insert the fork end of the head clamp. It requires a little
effort to push home. In position, the horizontal bar of the 'A' should be
under the cover.
- It's possible that the gap in the cover may be in such a position that
it is impossible to insert the clamp. You may need to rotate the cover
and try again. If you inadvertently move the heads in the process, it's
best to repark them by removing the clamp, CTRL-Cing the PERQ and
relogging in and running
BYE /WAIT. Then reinsert the clamp.
- When the locking clip is in position, you can power down the machine
and unplug the mains lead.
- Now rotate the drive spindle (top end of the black motor belt cover)
until the locking hole in the spindle pulley (bottom end of the belt
cover) lines up with the hole in the cover. Note that you must only rotate
the spindle clockwise! Insert the locking screw and confirm that the
spindle no longer rotates freely.
- Unplug the 3-wire mains power cable at the left of the hard disk.
This ensures that the motor is not burned out if the PERQ is inadvertently
powered up while the motor is locked.
- Refit the casing. Your PERQ is now ready to be moved.
How To Unpark The Heads
Unparking the heads is roughly the reverse of the parking procedure.
It's slightly less hairy, though.
- Remove the covers as in the parking notes. Again, unplug the mains
first!
- Remove the locking screw and put it somewhere safe.
- Plug the power cable back into the hard drive.
- Plug in the mains, and pull the interlock buttons.
The warnings about live mains still apply!
- Make sure you get the timing on this right. Power up. Wait 30 seconds
for the drive to get up to speed. You now have 90
seconds to
remove the head locking clip. If you don't do this in time, the OS will
try to boot with the heads locked, and may corrupt the disk by writing
in the wrong place.
- The PERQ should now power up normally. Log in and turn it off
using
BYE /OFF.
- Unplug from the mains and put the covers back on. Put the clamp and
the locking screw safely inside the cabinet first. (I recommend taping the
screw to the clamp so you don't lose it...)
Other PERQs
I don't have most of these other models of PERQ, but here are some
notes from a friend about how to lock the heads on these models.
They are rather easier to do, mainly because the Shugart 14 inch drives
were replaced by smaller, higher capacity drives on later models.
PERQ 2-T1s: (8" Micropolis hard disk). Remove the plastic rear
cover (if it's still in place). Turn the white plastic screwhead to the
"lock" position, ideally with the correct PERQ service tool.
If you don't have that tool, use a large screwdriver.
PERQ 2-T2s (and PERQ 2-T4s, for that matter):
5.25" hard drives, like those in IBM-type PCs. These are self-parking.
You don't do anything...
PERQ 3s: also use 5.25" drives, which are self-parking.
There are more pictures of the Shugart with the other
images of my PERQ 1.
Back to the PERQ page...
This page written by Peter Maydell
(pmaydell@chiark.greenend.org.uk).